|
What
is Macro & Close-up Photography: |
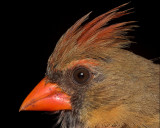
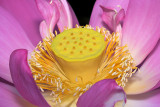
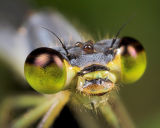
Basically, when you take photos of small things and make them
look large. The appeal is allowing people to see details that
are normally difficult to see with the naked eye. |
|
Which lenses can I use
with my DSLR:

 |
Here are a few options as I see them:
| Method |
Difficulty |
Results |
| Zoom lens with macro capability |
medium |
fair
- to -
good |
| Dedicated macro lens |
easy
- to -
medium |
good
- to -
great |
| Zoom or Prime (fixed focal length) lens with extension tubes
and/or teleconverters |
medium
- to -
difficult |
fair
- to - great |
| Zoom or Prime lens with another prime lens
reversed in front |
difficult |
fair
- to -
great |
|
|
Which lens do you
recommend:


 |
Since this article is about "Macro Made Easy" I would recommend
a dedicated macro lens.
To take it a step further, I think the easiest macro lens
focal length range to use is 90mm to 105mm. This allows easily
handheld shots at a good working distance. Yes, I said handheld!
A shorter focal length macro lens (50mm to 60mm) requires that you
get closer to the subject to achieve highest magnification. This
can be a bit more challenging with skittish subjects. Also, the
wider angle will include more of the potentially distracting
background making it harder to isolate the subject.
On the other
hand a shorter focal length macro lens makes it easier to take handheld shots since you can use a
slower shutter speed without seeing camera shake in the photos. They also may do better with diffused
onboard flash since you are closer to the subject.
Longer focal length macro lenses are a bit harder to handhold
because they tend to be heavier and require faster shutter speeds
to avoid seeing camera shake in the photos. On many DSLR systems
(Canon, Nikon, etc) a shutter speed faster than 1/200 of a second (or
so)
requires high speed synchronization which some flash units
(especially onboard units) cannot do. If this is the case
then you may need to use a tripod or monopod to effectively
freeze the subject with a longer focal length lens.
Also, with a longer focal length lens the "external
flash in the hot shoe with Softbox" solution I recommend
below is not as effective since the working distance between the
lens and the subject is greater. Using flash with longer focal
lengths will tend to flatten (less depth) the look of the image
since all of the light comes from the side.
On the other hand, a longer
focal length lens will isolate the subject better resulting in a
less distracting background in the image. |
|
Should I use Flash:


|
Flash helps freeze the subject which makes it much easier to
handhold. So, keeping with the "Macro Made Easy" theme, flash
use is recommended to keep things easy. It also helps brighten the shadowy
details that are often lost in natural light macros. It is best
to diffuse the flash so that it is less likely to "blow out"
light colored areas or reflect off shiny parts of the subject. With the focal lengths suggested above, an external flash in
the hot shoe, with a LumiQuest Softbox, make an excellent combination. If you
still find the flash too strong see if your camera or external
flash unit has Flash Exposure Compensation. I usually set it to
-1/3 stop.
If you do not have an external flash, the onboard flash can
be used. It is a good idea to still use something to diffuse the
light. A sleeve made out of folded and taped thin paper (such as
a coffee filter)
can help. Try doubling up the material if you need more
diffusion. You can also see if your camera offers Flash Exposure
Compensation for the onboard flash to reduce the amount of light
output if necessary.
Another option to diffuse the onboard flash is the
Lumiquest Soft Screen.
(No, I am not paid by Lumiquest, I just like their products)
There are times that natural light is preferred for macro.
One example is when you want a brighter background since using
flash often darkens the background. When this is the case use a tripod and use a low ISO to allow
for greatest dynamic range. Your subject should be stationary so
that you can use longer shutter speeds. Or you can use a wider
aperture, to keep the shutter speed faster. Just remember that
your depth of field decreases the wider the aperture setting.
One more note about flash use... check your histogram for
proper exposure. If you need a bit more light (histogram is
bunched to the left side) it is often best to use "flash
exposure compensation" rather than changing the aperture or
shutter speed. Some flash units have controls for this,
otherwise you can make the adjustment in your camera.
|
Auto focus or manual
focus:
 |
That really depends on the lens you are using and the situation
at hand.
Some macro lenses hunt for focus which makes it difficult, so
manual focus ends up being easier. Other macro lenses auto focus
quite well... at least in most situations.
When you are in low light conditions manual focus is usually
required regardless of which lens you use. |
|
What is the best way to
manual focus:
 |
Place the lens in manual focus mode. Frame the subject using the
manual focus ring, press the shutter half way, and then move the
camera slightly toward and then away from the subject until you
see it in focus in the viewfinder. Then press the shutter button
the rest of the way to take the photo.
This approach takes some practice, but offers
reliable results. Just remember the slightest camera movement
(like when pressing the shutter button) can drastically affect
what ends up in focus in the resulting image. |
|
What camera settings should I use:
 |
Here are some settings to start with:
- Set the camera in manual exposure mode
- Turn the flash on and use a diffuser
- Set the shutter speed to your camera's maximum flash sync
speed. If this does not effectively freeze the action then you
may need to use high speed flash synch and a faster shutter
speed if your flash unit allows.
If using a 90mm to 105mm lens use 1/200
- Set aperture between f/11and f/16
If your subject is further away then try f/8
- Set ISO to 100
|
|
What else do I need to know:
 |
A few more things to consider:
- When working close with high magnification the depth of
field becomes very shallow. Often only part of your
subject will be sharp which requires careful focusing to
ensure the important things are in focus.
- If your subject has an eye, be sure that it is in the depth
of field and sharp. This will give the impression that the
image is sharp overall.
- With Digital SLR cameras diffraction starts to degrade the
overall sharpness of the image starting with apertures higher
than
f/11. So, even though f/22 will give you more depth of field,
the resulting image will be fairly soft. On the other
hand, the lower the aperture setting the shallower the depth
of field. So, an aperture of f/2.8 will result in very little
of your subject being in the acceptable depth of field.
- If your subject will not move or your macros are not
coming out sharp, you may want to try a tripod and use the
camera's timer or a shutter release cable. This will eliminate
the chance of blur being introduced by camera movement and
will let you experiment with different settings to help get
sharper results.
|
|
What setup do you use for easy macros:
 |
I use the following for an easy macro setup:
- Canon DSLR
- Canon 100mm dedicated macro lens
- Canon 420EX or 580EX Flash with Lumiquest SoftBox
- Handheld - shutter speed 1/200, aperture f/11 - f/16, ISO 100
|